Saturday, December 9, 2017

Why a Stryd Run Power Meter Should Be Under the Tree

I love running. 

When I’m finished with a run, I have that sense of accomplishment and satiation that comes from endorphins coursing through my brain. For all the satisfaction that comes with the run itself - I’m a data guy.  A workout without data, metrics, charts and graphs is like witnessing a beautiful sunset on your dream vacation and not having the picture to show your relatives.  For all the data that you can use to analyze and improve your running, I’ve learned in the past two weeks that there is nothing more powerful (all pun intended) than Stryd power.  Here’s why.

For many runners, data comes from what is native to your GPS watch in terms of pace, distance, heart rate, grade and elevation.  I’ve been intrigued with running with power and using that data in my training since running power meters first hit the market.  Running with a power meter promised to have many of the same advantages as a cycling power meter.  By knowing your run power, you could know your actual work and output during training. If you know your actual rate of work in training, it follows that you would know definitively what performance you can expect to perform on race day - exceed that work rate, and you risk of unraveling in a muscle-quivering mess walking from aid station to aid station.

Intrigued to put running with a power meter to the test, I recently had a chance to talk to coach Jim Vance, who literally wrote the book Run with Power.  Jim advocated Stryd as the product leader in the space, so I was eager to get my hands on a Stryd foot pod and try it for myself.  While it has no direct bearing on product performance, the out-of-the-box experience is an important first impression and speaks volumes about how much Stryd has thought about the user.  Simplification is paramount.  Stryd gets a high rating right from the start. The first thing I experienced when I flipped back the cardboard lid of the package was a simple black on white card with 3 steps comprised of 9 words of instruction. 

Get Started Here. 

Following the instructions to “get started here”, I opened my browser and navigated to stryd.com/get-started. The Set Up Stryd process is straight-forward and tech sexy.  The wireless charging unit is sleek and has the look and feel of quality.  The registration and profile setup are easy they warrant no further description and the integration to your other fitness applications is idiot proof.  I had my Stryd configured to receive data from my Garmin and send data to TrainingPeaks as fast as I could read the text on the page.  Installing the Stryd app on my iPhone was equally easy and the foot pod seamlessly interfaces with the phone app.  One of my favorite features on the phone app is being able to check the battery charge level of the Stryd foot pod to monitor the progress to a full charge – another tech sexy point!

Run With Stryd

The Run with Stryd process is where you first start to interface Stryd with your GPS or other watch; in my case a Garmin 735XT.  Stryd’s website is very intuitive and the instructions are simple.  Select the type of watch you are pairing the Stryd with and then follow Stryd’s instructions.  If you follow the instructions literally, you should have no problem completing the device connection and collecting data. Deviate at all from the instructions and you will potentially find yourself lost on in your watch’s menu.  My advice, trust the Stryd instructions and not your belief in your confidence in tech adoption. 

Stryd is compatible with Garmin, Suunto, Polar, iOS, Android, or you can use the Stryd by itself. In the case of Garmin, I downloaded the Stryd Power activity app and then installed it in the Garmin Express application from my laptop.  On my watch, I set up a running activity screen with a single field for “power”.  Once the setup was completed, I started a run activity and the power foot pod connected within 20 seconds. During my first run with Stryd I frequently checked my watch to take note of the power numbers in various terrain (uphill, flats and downhill), and was pleased to see the reading adjust instantly to the changes. Hit an uphill section and the number reading would instantly increase.  Adjusting my pace on a constant grade, and again the display would immediately change in response.  By contrast, pace and heart rate would like considerably behind the Stryd’s response time.
At the end of my run, I completed the activity, launched the app and with a single thumb press synced my power to Stryd, Garmin and TrainingPeaks. From the Stryd app, I could immediately see a summary of my power data from the run on my phone. Eager to see my complete power data analysis I turned to the last of the three easy “get started” steps - Learn From Stryd.  
Navigating to Power Center on the Stryd website where you can begin to analyze your data. Again, first impressions are important and the Analyze view of Power Center presents a dashboard view with a summary of the workout including power, form power and cadence.  I used the radio buttons to toggle between elapsed and moving data to filter out stop light stops.  This is great if you capture elapsed time on your GPS and still want the option to just see moving time data.

It’s not been more than a week and I’ve collected Stryd data for six runs in that time.  That has enabled me to explore some of the other features of Power Center, including the comparison feature to evaluate two workouts side by side and compare differences.  Analysis is only the beginning of the features in Power Center.  I wanted to begin exploring other features in the application, including Improve, Compete and Settings. 
Settings is where I first completed my profile and data sync preferences.  This is also where I would establish my power zones.  Stryd provides 4 methods in the application for establishing your power zones.  For this review, I chose the 5K estimation method.  During this past week, I performed the Jim Vance 20-minute rFTPw test and ironically came up with similar FTP numbers using the 5K estimation method.  I’ll likely experiment with the other methods, including the 3-9 test, which involves a 3-minute all out, followed by a short recovery, and then a 9-minute hard effort.  With FTP known, I was able to establish my power training zones and experiment with training within specific power zone ranges. 

Power Center

The Improve screen of Power Center is designed to provide individual insights about your power data and running performance.  The Runner Profile presents your relative strengths and weaknesses with respect to metabolic fitness, muscle power, and muscle endurance. The Training Optimizer suggests workouts that will help you focus areas where you have the most potential and areas for improvement.  Having facts and data helps me be accountable to today’s performance and provides actionable information for setting goals and direction to my training.  The Training Power Heat Map does a great job of illustrating where you are spending your training time compared to where you should be spending your time to reach your running goals.
The Stryd and Power Center has provided a whole new world of insights in the first week of usage.  It has peaked my curiosity to learn more, and is channeling me to address my greatest opportunities for improvement and track my progress.  It feels like I’ve just begun to understand the new possibilities these insights will provide and stirred up a sense of excitement about my training plan over the winter months and eager anticipation for my race season next year. 
If you are looking to stir up some excitement for your tech-lover-athlete this holiday season, Stryd is more powerful than mistletoe.  Cheers!

Authored by Rich Soares


Tuesday, May 30, 2017

Heros!

We all have them.  When I was in grade school, my favorite super hero was Captain America. He didn't really have a "super power", but he did have a shield and a motor cycle - pretty cool super powers to an 8 year old.

Today my hero's super power is "character"!. Meet my friend Jamie Twedt. This past weekend, Jamie shared her story about her road to the Ironman World Championship this October.  I won't do it justice to try to summarize it in the blog - you simply have to listen to Episode 75 of MHE.

Jame spoke very personally about her sister (Dawn) who recently lost her battle with ovarian cancer. Jamie and Dawn never finish a conversation about whether or not Jamie should pursue an Ironman Foundation slot to Kona.  If you've listened to the interview, you know how that conversation ended.


We were joined by pro triathlete Rachel Joyce, who is on the Board of Advisers for Women For Tri.  Rachel joined us to celebrate and support Jamie's journey to Kona and explain the mission, strategy and the growth of the organization.


SPOILER ALERT - Jamie is going to Kona!  She has partnered up with Women For Tri and is asking you to help her raise $40,000.

Health IQ has offered to help Jamie by making a donation to Jamie's charity up to $200.


Take the Triathlon Quiz! 
This Quiz was developed by over a dozen professional triathletes and coaches.  Check your knowledge with questions from Siri Lindley, Bek Keat, Terry Laughlin and more!


Sunday, April 9, 2017

USE YOUR HEAD! The "Neural Pathway" to Faster and Safer Endurance Performance Gains


The Neural Pathway to Endurance Performance Gains

Last weekend I had the best swim training sessions I can recall in more than twelve years of swimming.  It wasn't the longest swim workout.  It wasn't the most intense swim session.  It wasn't a well designed Masters workout and it wasn't with my friends that I enjoy swimming with.  In fact, I wouldn't have any data to analyze because my GPS watch battery died the moment I pressed the "start" button.  While frustrating, not paying attention to my watch was part of the success  What made this the best swim training session in more than a decade?  Hold onto that question and read on.

Mile High Endurance Podcast is dedicated to helping listeners accelerate their learning of the endurance sports. Along with co-hosts Khem Suthiwan and Bill Plock, we want to connect you to experts to learn how to improve and get faster.  A number of exerts over recent months have pointed us to the potential of "neural development" and I've become increasingly curious about the brain's role in our pursuit of improving performance in in triathlon and other endurance sports. 

Training for endurance sports like swimming, cycling and running has historically been defined in terms of fitness, strength and economy of motion.  Endurance sport training is traditionally concerned with adaptations though a combination of aerobic and anaerobic training at varying duration and intensities.  These adaptations are achieved through important considerations and accurately applying concepts like periodization, acute training load, chronic training load, and recovery.  These are essential aspects of physiological development.


Experts in a variety of endurance sport disciplines are advocating neural development as an importance of aspect of endurance training.  In the article 
What is Neural Training and Why Do It? by Terry Laughlin, founder of Total Immersion, writes "Neural Training. In this form of training, you target adaptations to brain and nervous system. As you do, aerobic training still occurs, but is precisely matched to the demands of the task to which your brain and nervous system are adapted."  

In his article, The Science Behind How We Learn New Skills, Thorin Klososwski writes "Every time you learn something new, your brain changes in a pretty substantial way. In turn, this makes other parts of your life easier because the benefits of learning stretch further than just being good at something". 


What is Learning?

What is learning?  Early in our lives we learn some basic things such as how to walk and talk.  As we grow older and our brains develop we learn logic, language and music.  We also take walking to the next level and learn to swim, bike and run, among other sports.  True learning and long term retention allows us to build a base of knowledge that we continue to build on as we refine our understanding and gain new insights. Whether we are learning to swim or learning an algebraic equation, we are learning. While learning to swim happens in a different part of our brains (swimming in the motor cortex) than the part of the brain that helps us learn statistics (using the frontal lobe).  Learning is learning.

In the book, "Make It Stick - The Science of Successful Learning", authors Peter Brown, Henry Roediger, and Mark McDaniel help us to understand what contemporary research tells us about how we learn successfully with retention.  The brain is plastic and malleable through changing neural connections.  These authors explain how effective learning occurs, they reveal misconceptions about previously believed effective methods of learning, and explain what methods truly result in faster and longer memory.  

In one cited experiment, they describe two groups of children to assess which of two learning approaches would result in effective learning. The goal of the groups was to toss a ball into a basket from a distance of three feet.  Group A was only able to practice the ball toss from three feet from the basket.  Group B was only able to practice the toss from two and four feet from the basket - never from three feet.  What do you think they learned about how Groups A and B compared in their accuracy when tested more than a week after the practice phase?  Group B outperformed A by a significant margin.  Why?  While there are many dynamics at play here, the basic explanation was because Group B had the benefit of learning the difference in effort and motion between two and four feet causing their brains to work harder during the learning process.  Each time the subject had to try to learn it takes this much effort with this motion to hit the basket from two feet and that much effort for four feet. It's that concentration and recall that causes the neural pathways to form.  


The authors use an analogy of a grassy field to represent the tapestry of the brain's neural connections.  If we walk lightly across a grassy field once, we may leave a slight trace of our footsteps.  Walk that same path lightly many times and you may start to see the effect  of deepening traces from repeated light footsteps.  Drag or stomp your feet as you make your way across the field and you're likely to leave deeper impressions. Forcing the brain to work in the form of recalling knowledge or concentration on coordinated muscle movements results in learning.


Learning physical skills like swimming, biking and running cause these same brain changes to make the execution of movements easier. When I see professional athletes demonstrate perfect form, I say to myself "I wish I could learn to swim like Amanda Stevens, or bike like Andrew Starkowitz, or run like Marinda Carfrae. What does that mean to learn to do that? Okay, I may not have the genetics for the VO2 max or composition of slow and fast twitch muscles as these athletes. However, I can learn form and skill. 


There are gaps between Rinny's any my running performance. I can however study and learn the elements of good running economy and performance and learn them through focused learning session. Think of them as training sessions, but the goal is to learn. Yes there will be physiology adaptations that come along for the ride, but I want to maximize learning.  I have a run workout that is only 30 minutes and it's sole purpose is to focus on cadence and ground contact time. I don't think about anything else, but those two things and using my mind to figure out what coordinated muscle contractions and alignments result in higher cadence and lower contact time.

What Makes a Great Training Session?

I began this article proclaiming one of my best swim training sessions in more than a decade.  What made that training session so good?  I mentioned that I had been emailing a Researcher at Halo Neuroscience to additional instruction on how to design my training sessions to get the best learning outcome.  My question was about how to design my training to best leverage the Halo Sport, but the response from Alex is useful to understand what made my swim last week so effective.

"The beauty of Halo Sport is that because it targets the brain, it allows it to be applicable to a number 

of different applications and adaptable to the athlete's needs.  The double edged sword is that all movements are better encoded, not just the "better" ones.  Therefore the best type of training to pair with Halo Sport is less about what exercises and more about the attitude.  You want to pair Halo Sport with periods of deep practice, ensuring that the best repetitions are what are being better encoded and transferred into the central pattern generators we talked about."  

He also shared an article on on the Halo Neuroscience website on  Swim Training.  From the article, "Swimming is not the primary mode of locomotion for humans, so the motor cortex plays a larger role in coordinating swimming patterns than in, say, walking or running. Mastering CPG coordination is a perfect task for the motor cortex, as this area is specifically geared towards using motor skill learning to pinpoint the appropriate motor output."


Learning Session Approach

I started last week's swim in the weightroom of the recreation center that also houses my pool. The entire training session can be broken down in to thee sections:
  1. Core and Warm Up - 20 minutes
  2. Shoulder and Back Strength, Imagery and Form - 30 minutes
  3. Swim Skill Drills  - 30 minutes
While I will overlay the application of the Halo Sport as I describe each of the three sections of the workout, the approach, techniques and elapsed time are the same.


Core and Warm Up

I like to start every strength session with 20 minutes of core work.  I do three strength sessions per week and each session has a different mix.  In my pre-swim core workout this day, I had three core exercises. They were 2 and 1 Arm Supermans, Scissor Kicks, and V-Ups. I did these as a circuit of 1 minute 2 & 1-Arm Superman, 1 minute rest, 1 minutes Scissor Kicks, 1 minute rest and so on.

My focus while performing each of these core exercises is to be thoughtful about the application to swimming through visualization.  I will close my eyes while doing the Superman, for example.  Face down on a mat with my pelvis pressed firmly into the ground I extend both arms and imagine myself as I extending in a push off the wall of the pool. My shoulders, arms and fingers stretch for the bottom corner of pool wall ahead of me, while my legs, feet and toes are extended and pointing to the pool wall behind me. After holding that pose for 10 seconds, I bring my right hand back to my side with left hand extended, I point my right leg and toes in a counter balancing move while engaging my core.  After ten seconds with left hand forward and right foot extended, I switch sides as I think through the gliding motion, extension and core engagement.

I continue though Scissor Kicks and V-Ups with the same mindful, swim focused imagery equivalents and then progress to Back and shoulder strength training.

Halo Sport Application: at the beginning of my core work, I turn on the Halo Sport and start the 20 minute Neural Priming session.  I set the intensity and just go through the core workout as normal while I listen to music and get primed.  At the the end of the priming session, my Neural Cortex is in a state of hyper plasticity for 60 more minutes and I proceeded to work on back and shoulder functional strength training.


Back and Shoulder

Important Note: anyone starting any of these exercises should seek a certified personal trainer or physical therapist for instruction on proper form and injury avoidance.

I do 30 minutes of back and should strength training with specific functional movements to replicate the various functional movements of swimming arm recovery the exercises performed in this session were 3 x each of the following functional movement (and it's paired strength exercise):

  1. Swim Motion  - Rotating shoulder forward (Single Side Dumbbell Shoulder Shrug)
  2. Swim Motion  - High elbow/lead with elbow (High Elbow Standing Shoulder Fly)
  3. Swim Motion - Hop N Slot (Shoulder Press)
  4. Swim Motion -  Catch and Pull (Pull Ups)

In the Pool

With the strength training session complete, I jump in the pool for a 30 minute swimming training session that is focused solely on skill drills.  Borrowing skills from Total Immersion Effortless Self-Coaching 1.0 Course.  With each of the skills below, I used a snorkel to take breathing out of the motor coordination equation.  The skills were done as 100 x each and cycled though.three times. 
  1. Superman (1 & 2 Arm)
  2. Recovery Elbow Swing
  3. Hop N Slot
  4. Full bi-lateral swim
I've been practicing these skills for several weeks, but I am still am occasionally clumsy with them. On this day, my proprioception was high and the motions came smoothly with intentional effort. By the time I was executing the third round of drills and putting it altogether with what felt like perfect timing and balance - I was giddy with excitement. 

It is exciting to have breakthrough training sessions. When we are younger and newer to the sport, it's reaching those new levels of speed and distance. Today, the excitement of "cracking the code" and developing neural pathways toward perfecting my swim stroke.

In Summary

This swim training session is just one example of how I have paired functional movement visualization with strength training and skill practice.  In this session, my primary focus was arm recovery and keeping a strong core.  You can imagine the number of possibilities for applying neural training to different skills related to swimming, cycling and running.

I'll take on examples of pairing functional strength training with specific functional movements of cycling and running in future articles.  Keep in mind, these will not be the "going-through-the motions" article. This will be an article focused on how to keep your head in the game and learn how to be faster and more efficient.

Rich Soares

Wednesday, February 15, 2017

Neuro Halo Sport - Out of the Box Experience

Experiencing the Neuro Halo Sport

Background

What is it?

Halo Sport is a training device that accelerates gains in skill, strength, explosiveness and endurance when paired with athletic training. Halo Sport stimulates the brain's motor cortex, resulting in stronger, more optimized signals from the brain to the muscles. Similar to a pre-workout meal that primes the body for a productive training session, Halo Sport primes the brain to prepare you for your most effective workout.

How does it work?

Halo Sport works through a process called Neuropriming. Athletes wear Halo Sport before or during training, and the device's soft foam Primers deliver electrical stimulation to the brain’s motor cortex. This increases neuroplasticity, which accelerates the optimization of neuromuscular circuitry through training. Improved neuromuscular output leads to more precise, coordinated, and/or explosive movement — whichever the athlete targets during training.

Why am I talking about it?

I have been fascinated with this topic of neural plasticity for some time. There is a book that I read a couple of years ago that really shifted the way I think about learning.  The book was titled "Make It Stick, The Science of Success Learning" by Peter Brown. Part of what I took away from this book was that it takes effort to learn.  

There are many methods of learning that lead to more successful learning, but essentially it is the effort of questioning and recall without assistance that forces us to really effort to learn.  That effort actually assists in the creation neural pathways for learning to take place.  The author equates thinking through a learning objective to walking across a grass field.  If walking across the field represents the process of thinking through a subject.  The more we cross the field, the more worn a path becomes.  Such is the case with the effort of thinking and recall, it eventually blazes a worn path of neural pathways.

My curiosity compelled me to contact Halo Neuroscience and seeing if I could get an interview with their marketing team.  The team an Halo Neuroscience connected me with their Chief Marketing Offier, Mark Mastalir, In the interview Mark helped us to understand the background, science, design and application of the Halo Neuro Sport headset. Stay tuned for upcoming Blog publications in the near future on the science, design and application of the Halo Sport.  

Mark graciously provided a Halo Sport for me to evaluate and share my experience with the MHE audience.  
Before I can talk about my experience with the Halo Sport, we have to take the unit out of the box. The "out of the box" experience with technology is one of life's true joys if designed well.

Out of the Box Experience

The "out of the box" experience is something that can set a product apart and Halo Neuroscience gets
it. The first thing I noticed picking lifting the box to my dining room table was the heft of the box - I knew the contents had substance. After carefully using a pair of kitchen scissors to slice the packing tape on the outside of the 12"x 12"x 9" standard brown box, I pulled back the flaps and knew I was in for a good "out of the box" experience.  The kind of out-of-the-box experience people describe when they open an Apple product, for example.

Opening the brown flaps of the packing box, I noticed the black product box suspended with black foam pads to protect the contents. Pulling the black box out, I had a heightened expectation about the pending discovery.  There is a slick marketing cardboard wrap around the quality box containing the unit.  Removing the lid, the contents were revealed including:

Headset
Quick Dry Case
Box of Primers
Charger and USB Cable
Audio Cord
Water Spray Bottle

Simplicity is the key. The instruction manual included with the Halo Sport was about the size of a playing card, which essentially leads you to installing the App and follow instructions for setup therin. The steps to pair the headset with the app and start a neuro priming session is easier than setting up an iPhone.

The application connects to the device via Bluetooth. It was straight forward and done within the app (no need to go to your phones Settings menu). If you want to listen to music, use the included flat  cord, included and wrapped carefully with a Velcro band.

Stay tuned for more blog publications on:

  • First impressions from use
  • Rich's testing protocol
  • Progress reports


Sunday, January 15, 2017

Touring New TrainingPeaks ATP and Workout Builder Features

Touring Annual Training Plan and Workout Builder with TSS

Background

Before I get into the content of this article, I want to share my personal inspirations for writing on the topic.  A few months ago I decided to upgrade from the athlete to the coaches addition of TrainingPeaks.  I have been creating my own workouts and Annual Training Plan (ATP) as an athlete, but recently had an opportunity to work with an athlete and needed to create an ATP and workouts for someone other than myself.  When I upgraded, I was contacted by TrainingPeaks customer support and was offered a one on one orientation session.  I accepted and shortly after had my 45 minute overview via Skype.  

The orientation was useful and I learned a number of new things that I've found useful and want to share with other athlete and coach TrainingPeaks users.  Before I do, let me complete the thought on the inspiration.  Tony, from TrainingPeaks, was walking me through how to create an Annual Training Plan.  While he demonstrated the options for ATP, the thought was occurring to me that I was going to be creating an ATP for someone else in the near future.  The pending task of data entry and calculations to design and build the ATP to give my athlete the appropriate training load and ramp up was at the front of mind.  My specific thought in that moment was "it would be great if you could just enter the target Training Stress Score (TSS) or Chronic Training Load (CTL) and have that automatically produce an ATP volume required to prepare an athlete for the demand of their A Race. 

It seemed like a reasonable question, so I asked Tony.  He chuckled a bit, and I expected to hear Tony follow the chuckle with a "it's right there in front of you", Instead, Tony explained that the functionality did not exist yet, but was actually scheduled in an upcoming release.  It's one thing to have a new feature in a software product come out that is useful, but that you didn't necessarily need.  Sometimes those features surprise us and reveal needs we didn't know we had.  It is quite another to have a specific need or problem you want to solve (in this case, hours of data entry and calculations) and the feature comes right as you needed.

Now this is probably not very interesting to most people, but I am a software Product Manager in my day job.  My job is to understand the needs of my users and convey these needs based on value to our software development teams.  It's always gratifying when someone comes to me with a need and it's something we already have in development and know that what we are building is in demand.  Until now, I had never been on the receiving end of that experience.


Begin with your intended result in mind


Enough of the inspiration, let's get into my exploration of the new Annual Training Plan and Workout Builder.  Before we talk about these features, it's important that you have foundation of some of the terms and concepts that make these features so valuable.  I'm assuming that you are reading this article and using TrainingPeaks as a tool to help you train yourself or someone else for a race or endurance event.  That race of event is going to demand physical effort or work that you, or your athlete, needs to be able to perform on that day.  What you need is a plan to get there.  How do you assess or define the work required for that event and apply training stress to the body over the coming days, weeks and months to be ready for that demand.  Before we explore the application, I recommend you read Why Planning With Training Stress Score Is The Most Accurate Way To Plan Your Season by Alan Couzens and Jim Vance. 

Annual Training Plan 

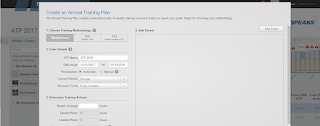
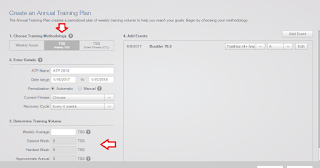
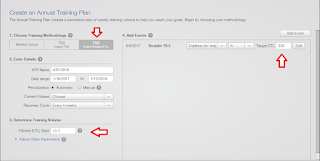
Assuming you have a foundation understanding of what TSS your race(s) or event(s) will require, we can start building your Annual Training Plan (ATP).  Log in to TrainingPeaks and click on page menu item ATP at the top center of landing page.  The folks at TrainingPeaks have made this an easy step-by-step process and the first step is to choose the methodology.  This is where the addition of TSS is introduced as a new feature in the ATP and the focus of this article.  To understand the value of the feature, I'll go through all three of the methodologies briefly.

Weekly Hours

In Step 1 "Choosing Your Training Methodology", select "Weekly Hours" and then note the UI changes below, past Step 2 "Enter Details", to Step 3 "Determine Your Training Volume". Weekly Hours is the original methodology and assumes you are using weekly training volume as metric to gauge the demand of work required for training.   Here you can enter the values for the easiest, average, and hardest weeks in terms of hours of total training. 

Weekly TSS

Change the selection in Step 1 "Choosing Your Training Methodology", select "TSS (Weekly TSS)". Note the data entry fields below in Step 3 change to enter target TSS values.  Having an understanding of TSS and the TSS targets for race preparation are another subject and covered in the aforementioned Couzens and Vance article.  Again, you are entering the easiest, average and hardest week's TSS values appropriate for your physical goal.

TSS (Event Fitness/CTL)

Again, change the selection in Step 1, but this time to "TSS (Event Fitness/CTL).  Notice the changes that occur Step 3 Determine Training Volume and Step 4 Add Events.  In Step 3 you are now presented with your starting CTL, and in Step 4 your Events now have a data entry field for the target Chronic Training Load - again, refer to the Couzens/Vance article. This allows you to enter the CTL required for the demand of the race.  This is exactly what I was asking Tony for in my orientation. With your starting and goal CTL, you can create an ATP that is tailored for that change in CTL.


Other Aspects of ATP

The focus of the article is on the addition of TSS to the ATP Methodology and it's related changes to other components of ATP (eg, Training Volume and Events).  I skipped a tour of Step 2 "Enter Details" which includes naming your plan, defining the date range, periodization, current fitness, and recovery cycle.  For more on creating an ATP, read How to Create Your Annual Training Plan on the TrainingPeaks Blog.

The last thing I want to mention before I wrap up on the ATP discussion, is to say this should get you
started on using TSS and CTL to build your ATP.  You can now edit your ATP using the graphical controls or the data entry table.  The screen will present "ramp up" warnings if the CTL in the ATP is too aggressive.  You can adjust the CTL up or down by hovering your cursor over the top of the bar of the bar graph until you get the double-arrow cursor, left-click and then adjust up or down. Likewise, you can click your cursor in the table below and update the TSS.

Once you have your weekly TSS targets set, now it's time to build your workouts.  Start with your each weekly TSS target and break it down into the daily training TSS targets to reach that weekly target.  Based on yours or your athletes work schedule and lifestyle, you'll decide how much TSS to apply on which days (eg, a working age-grouper in a standard Mon-Fri work week is likely going to have time for higher TSS on the weekends).


Workout Builder

From the Calendar view, either click on Workout Library or create a new workout by clicking on the
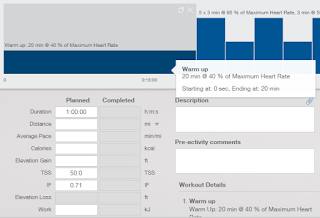
plus sign on the day you are adding a workout.  Once you have selected they type of workout, you are presented the normal data entry screen, except for the addition of the not-so-new icon in the top-center of the screen. When you click on the Workout Builder icon, you are presented with some parameter choices like Distance or Duration, and how you plan to assess intensity (eg, Percent of Max Heart Rate).  

You can click training blocks from the template at the top of the screen and drag them down to the work area. You can select whatever combination of workout components you want, including a warm up, active, variety of interval styles, cool down and recovery.  Sequence them by clicking and tracking them before or after the corresponding blocks.   

Within a block, you can hover over each and see the duration and intensity displayed in the text.  You will also see the zones dynamically specified for the individual athlete.  You will also see starting time/distance in the hover over text box.  This helps you make sure you have the right training volume to reach your target.  If you want to increase the intensity, you can over the top of the graph bar and you will see the mouse arrow change to a double-arrow.  You can left click and move the intensity up or down.

Likewise, you can adjust the duration by hovering over the side of the graph bar, reveal the double-arrow cursor.  Left click and then drag to be longer or shorter. Note that you can see the projected TSS.  You can relate this workout's TSS to your TSS weekly goal. If the workout should be a higher TSS, you can increase or decrease the number of reps in the set.  You can hover over the block and you will see a +/- on the left side of the block.  You can click on the + to add reps or the - to remove reps.


When you have your desired workout, with the duration and intensity to meet your desired TSS, add your Description and Pre-activity comments to match the design of the workout. Save the workout to your Workout Library with a name that matches the description and goal of the workout.

Wrap Up

I hope you found some value in this tour of the changes to ATP. leveraging TSS and CTL. Combined with Workout Builder and the derived TSS is an excellent pairing of tools to help you design the training you need for a successful season.

I plan to write about the dynamic intensity feature of Workout Builder in the coming weeks, but wanted to get this out as a foundation.

Good luck with your training and training plan this year.  Please be sure to check out the TrainingPeaks Blog for great articles on their features and coaching expertise.

If you have any questions about this article or my thoughts on the subject, feel free to contact me at rich@milehighendurance.com.