Touring Annual Training Plan and Workout Builder with TSS
Background
Before I get into the content of this article, I want to share my personal inspirations for writing on the topic. A few months ago I decided to upgrade from the athlete to the coaches addition of TrainingPeaks. I have been creating my own workouts and Annual Training Plan (ATP) as an athlete, but recently had an opportunity to work with an athlete and needed to create an ATP and workouts for someone other than myself. When I upgraded, I was contacted by TrainingPeaks customer support and was offered a one on one orientation session. I accepted and shortly after had my 45 minute overview via Skype.The orientation was useful and I learned a number of new things that I've found useful and want to share with other athlete and coach TrainingPeaks users. Before I do, let me complete the thought on the inspiration. Tony, from TrainingPeaks, was walking me through how to create an Annual Training Plan. While he demonstrated the options for ATP, the thought was occurring to me that I was going to be creating an ATP for someone else in the near future. The pending task of data entry and calculations to design and build the ATP to give my athlete the appropriate training load and ramp up was at the front of mind. My specific thought in that moment was "it would be great if you could just enter the target Training Stress Score (TSS) or Chronic Training Load (CTL) and have that automatically produce an ATP volume required to prepare an athlete for the demand of their A Race.
It seemed like a reasonable question, so I asked Tony. He chuckled a bit, and I expected to hear Tony follow the chuckle with a "it's right there in front of you", Instead, Tony explained that the functionality did not exist yet, but was actually scheduled in an upcoming release. It's one thing to have a new feature in a software product come out that is useful, but that you didn't necessarily need. Sometimes those features surprise us and reveal needs we didn't know we had. It is quite another to have a specific need or problem you want to solve (in this case, hours of data entry and calculations) and the feature comes right as you needed.
Now this is probably not very interesting to most people, but I am a software Product Manager in my day job. My job is to understand the needs of my users and convey these needs based on value to our software development teams. It's always gratifying when someone comes to me with a need and it's something we already have in development and know that what we are building is in demand. Until now, I had never been on the receiving end of that experience.
Begin with your intended result in mind
Annual Training Plan
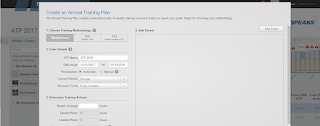
Assuming you have a foundation understanding of what TSS your race(s) or event(s) will require, we can start building your Annual Training Plan (ATP). Log in to TrainingPeaks and click on page menu item ATP at the top center of landing page. The folks at TrainingPeaks have made this an easy step-by-step process and the first step is to choose the methodology. This is where the addition of TSS is introduced as a new feature in the ATP and the focus of this article. To understand the value of the feature, I'll go through all three of the methodologies briefly.Weekly Hours
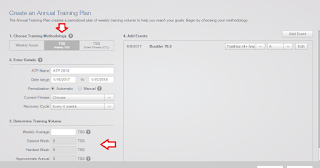
 In Step 1 "Choosing Your Training Methodology", select "Weekly Hours" and then note the UI changes below, past Step 2 "Enter Details", to Step 3 "Determine Your Training Volume". Weekly Hours is the original methodology and assumes you are using weekly training volume as metric to gauge the demand of work required for training. Here you can enter the values for the easiest, average, and hardest weeks in terms of hours of total training.
 Weekly TSS
 Change the selection in Step 1 "Choosing Your Training Methodology", select "TSS (Weekly TSS)". Note the data entry fields below in Step 3 change to enter target TSS values. Having an understanding of TSS and the TSS targets for race preparation are another subject and covered in the aforementioned Couzens and Vance article. Again, you are entering the easiest, average and hardest week's TSS values appropriate for your physical goal.
TSS (Event Fitness/CTL)
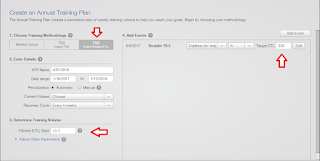
 Again, change the selection in Step 1, but this time to "TSS (Event Fitness/CTL). Notice the changes that occur Step 3 Determine Training Volume and Step 4 Add Events. In Step 3 you are now presented with your starting CTL, and in Step 4 your Events now have a data entry field for the target Chronic Training Load - again, refer to the Couzens/Vance article. This allows you to enter the CTL required for the demand of the race. This is exactly what I was asking Tony for in my orientation. With your starting and goal CTL, you can create an ATP that is tailored for that change in CTL.
Other Aspects of ATP
The focus of the article is on the addition of TSS to the ATP Methodology and it's related changes to other components of ATP (eg, Training Volume and Events). I skipped a tour of Step 2 "Enter Details" which includes naming your plan, defining the date range, periodization, current fitness, and recovery cycle. For more on creating an ATP, read How to Create Your Annual Training Plan on the TrainingPeaks Blog.The last thing I want to mention before I wrap up on the ATP discussion, is to say this should get you
started on using TSS and CTL to build your ATP. You can now edit your ATP using the graphical controls or the data entry table. The screen will present "ramp up" warnings if the CTL in the ATP is too aggressive. You can adjust the CTL up or down by hovering your cursor over the top of the bar of the bar graph until you get the double-arrow cursor, left-click and then adjust up or down. Likewise, you can click your cursor in the table below and update the TSS.
Once you have your weekly TSS targets set, now it's time to build your workouts. Start with your each weekly TSS target and break it down into the daily training TSS targets to reach that weekly target. Based on yours or your athletes work schedule and lifestyle, you'll decide how much TSS to apply on which days (eg, a working age-grouper in a standard Mon-Fri work week is likely going to have time for higher TSS on the weekends).
Workout Builder
From the Calendar view, either click on Workout Library or create a new workout by clicking on theplus sign on the day you are adding a workout. Once you have selected they type of workout, you are presented the normal data entry screen, except for the addition of the not-so-new icon in the top-center of the screen. When you click on the Workout Builder icon, you are presented with some parameter choices like Distance or Duration, and how you plan to assess intensity (eg, Percent of Max Heart Rate).
You can click training blocks from the template at the top of the screen and drag them down to the work area. You can select whatever combination of workout components you want, including a warm up, active, variety of interval styles, cool down and recovery. Sequence them by clicking and tracking them before or after the corresponding blocks.
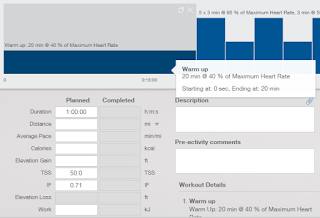
Within a block, you can hover over each and see the duration and intensity displayed in the text. You will also see the zones dynamically specified for the individual athlete. You will also see starting time/distance in the hover over text box. This helps you make sure you have the right training volume to reach your target. If you want to increase the intensity, you can over the top of the graph bar and you will see the mouse arrow change to a double-arrow. You can left click and move the intensity up or down.
 Likewise, you can adjust the
duration by hovering over the side of the graph bar, reveal the
double-arrow cursor. Left click and then drag to be longer or shorter. Note that you can see the
projected TSS. You can relate this workout's TSS to your TSS weekly goal. If the workout should be a higher TSS, you can increase or decrease the number of reps in the set. You can hover over the block and you will see a +/- on the left side of the block. You can click on the + to add reps or the - to remove reps.
Likewise, you can adjust the
duration by hovering over the side of the graph bar, reveal the
double-arrow cursor. Left click and then drag to be longer or shorter. Note that you can see the
projected TSS. You can relate this workout's TSS to your TSS weekly goal. If the workout should be a higher TSS, you can increase or decrease the number of reps in the set. You can hover over the block and you will see a +/- on the left side of the block. You can click on the + to add reps or the - to remove reps.When you have your desired workout, with the duration and intensity to meet your desired TSS, add your Description and Pre-activity comments to match the design of the workout. Save the workout to your Workout Library with a name that matches the description and goal of the workout.
Wrap Up
I plan to write about the dynamic intensity feature of Workout Builder in the coming weeks, but wanted to get this out as a foundation.
Good luck with your training and training plan this year. Please be sure to check out the TrainingPeaks Blog for great articles on their features and coaching expertise.
If you have any questions about this article or my thoughts on the subject, feel free to contact me at rich@milehighendurance.com.


No comments:
Post a Comment